2017-12-14 [macOS][Metal]MetalKit入門
Metalについては素人なため入門記事しか書けないので申し訳ない。
まず、サンプルプログラムの名前について説明する。
MetalといえばHeavy Metal。ヘビメタのギターといえばIbanezのDestroyer。なのでサンプルプログラムの名前はDestroyer。
調べてみたところ、駆逐艦という意味があるそうだ。これには驚いた。
話をサンプルに戻す。まず、MTKViewの派生クラスを用意する。
import Foundation
import MetalKit

class DestroyerView: MTKView {
    override func draw(_ dirtyRect: NSRect) {
        super.draw(dirtyRect)
    }
}
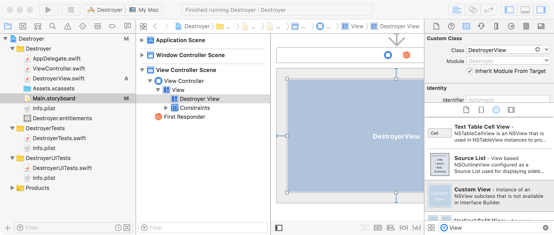
StoryboardでCustom Viewを貼り付け、それのクラスを先ほど作成したクラスに変更する。

これで、DestroyerViewで描画されるようになった。次は、Metal関連のコードを記述していく。
頂点と色の情報の構造体を定義する。
struct Vertex {
    var position: vector_float4
    var color: vector_float4
}
DestroyerViewクラスのメソッドdraw()に描画コードを記述子ていく。
デバイスを作成して設定する。
self.device = MTLCreateSystemDefaultDevice()
三角形の頂点と色情報を用意
        /* 三角形の頂点と色情報を用意 */
        let vertexData = [Vertex(position: [-0.8, -0.8, 0.0, 1.0], color: [1.0, 0.0, 0.0, 1.0]),
                          Vertex(position: [ 0.8, -0.8, 0.0, 1.0], color: [0.0, 1.0, 0.0, 1.0]),
                          Vertex(position: [ 0.0,  0.8, 0.0, 1.0], color: [0.0, 0.0, 1.0, 1.0]),]
        let vertexBuffer = device?.makeBuffer(bytes: vertexData,
                                              length: MemoryLayout.size(ofValue: vertexData[0]) * vertexData.count,
                                              options: [])
シェーダ・ライブラリを取得する。
        guard let library = device?.makeDefaultLibrary() else {
            return
        }
シェーダーを設定する。
        let vertexFunction = library.makeFunction(name: "vertex_func")
        let fragmentFunction = library.makeFunction(name: "fragment_func")
        let renderPipelineDescriptor = MTLRenderPipelineDescriptor()
        renderPipelineDescriptor.vertexFunction = vertexFunction
        renderPipelineDescriptor.fragmentFunction = fragmentFunction
RGBA 各8bit形式のピクセルを設定する。
renderPipelineDescriptor.colorAttachments[0].pixelFormat = .bgra8Unorm
パイプラインステートメントを作成する。
let renderPipelineState = try device?.makeRenderPipelineState(descriptor: renderPipelineDescriptor)
レンダーパス記述子
            guard let renderPassDescriptor = self.currentRenderPassDescriptor, let drawable = self.currentDrawable else {
                return
            }
クリアする色を設定
renderPassDescriptor.colorAttachments[0].clearColor = MTLClearColorMake(0.8, 0.7, 0.1, 1.0)
コマンドキューを生成し、コマンドキューからコマンドバッファを生成する
let commandBuffer = device?.makeCommandQueue()?.makeCommandBuffer()
シェーダへデータを送る
            let renderCommandEncoder = commandBuffer?.makeRenderCommandEncoder(descriptor: renderPassDescriptor)
            renderCommandEncoder?.setRenderPipelineState(renderPipelineState!)
            renderCommandEncoder?.setVertexBuffer(vertexBuffer, offset: 0, index: 0)
            renderCommandEncoder?.drawPrimitives(type: .triangle, vertexStart: 0, vertexCount: 3, instanceCount: 1)
            renderCommandEncoder?.endEncoding()
コマンドバッファのコミット
            commandBuffer?.present(drawable)
            commandBuffer?.commit()
シャーダーは、単純に入力値をそのまま返している。
#include >metal_stdlib<
using namespace metal;

struct Vertex {
    float4 position [[position]];
    float4 color;
};

vertex Vertex vertex_func(constant Vertex *vertices [[buffer(0)]],
                          uint vid [[vertex_id]]) {
    return vertices[vid];
}

fragment float4 fragment_func(Vertex vert [[stage_in]]) {
    float3 inColor = float3(vert.color.x, vert.color.y, vert.color.z);
    float4 outColor = float4(inColor.x, inColor.y, inColor.z, 1);
    return outColor;
}
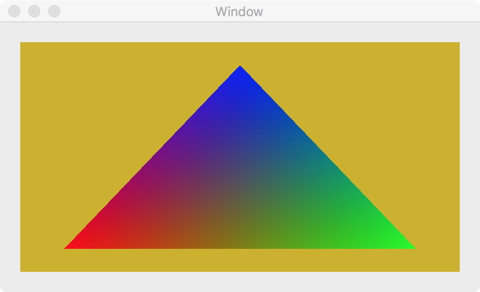
以下の通り、描画される。

[ツッコミを入れる]