トップ 最新 追記

Cocoa練習帳

iOS/iPhone/iPad/watchOS/tvOS/MacOSX/Android プログラミング, Objective-C, Cocoa, Swiftなど

2012|01|02|03|04|05|06|07|08|09|10|11|12|
2013|01|02|03|04|05|06|07|08|09|10|11|12|
2014|01|02|03|04|05|06|07|08|09|10|11|12|
2015|01|02|03|04|05|06|07|08|09|10|11|12|
2016|01|02|03|04|05|06|07|08|09|10|11|12|
2017|01|02|03|04|05|06|07|08|09|10|11|12|
2018|01|02|03|04|05|06|07|08|09|10|11|12|
2019|01|02|03|04|05|06|07|08|09|10|11|12|
2020|01|02|03|04|05|06|07|08|09|10|11|12|
2021|01|02|03|04|05|06|07|08|09|10|11|12|
2022|01|02|03|04|05|06|07|08|09|10|11|12|
2023|01|02|03|04|05|06|07|08|09|10|11|12|
2024|01|02|

2013-07-01 [OSX]ドライバについて(driver)(その2)

ドライバーがロードされたかどうかが分かっても面白くないということで、対象のUSB機器が抜き差しされたら、ログが出力される事を確認することにした。

以前紹介した、DarwinのソースコードのIOUSBFamily-(バージョン番号).tar.gzのExamplesにあるVendorSpecific Driverのプロジェクトを開いて、Info.plistを確認する。
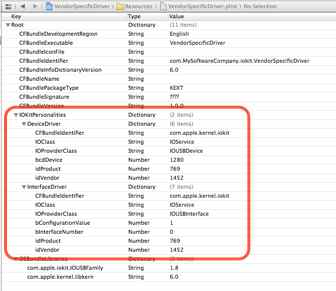
VendorSpecificDriver.plist

IOProviderClassをIOUSBDeviceにして、bcdDeviceとiDProduct、idVendorを対象機器の値にすれば、抜き差しに反応しそうだ!

以前の開発環境に含まれていたUSB Proberを持っていたら、それを使って、SmartScrollの情報を確認する。
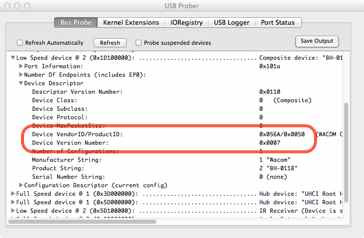
USB Prober

VendorIDが0x056A、ProductIDが0x0050、DeviceVersionNumberが0x0007なので、SmartScrollDriver-Info.plistのIOKitPersonalitiesのSmartScrollDriverにbcdDeviceとidProduct、idVendorを追加して、7と80、1386を入力する。

SmartScrollDriver-Info.plist

この内容でビルドしてドライバーを前回の方法でロードする。

$ sudo cp -R SmartScrollDriver.kext /tmp
$ sudo kextutil -v /tmp/SmartScrollDriver.kext
Notice: /tmp/SmartScrollDriver.kext has debug properties set.
/tmp/SmartScrollDriver.kext appears to be loadable (not including linkage for on-disk libraries).
Loading /tmp/SmartScrollDriver.kext.
/tmp/SmartScrollDriver.kext successfully loaded (or already loaded).

kernel.logをtailし、USB機器を差し込んで、抜く。

$ tail -f /var/log/kernel.log
Jul  1 22:30:56 mbc2d kernel[0]: [SmartScrollDriver]Initializing
Jul  1 22:30:56 mbc2d kernel[0]: [SmartScrollDriver]Probing
Jul  1 22:30:56 mbc2d kernel[0]: No interval found for . Using 8000000
Jul  1 22:30:56 mbc2d kernel[0]: [SmartScrollDriver]Starting
Jul  1 22:31:14 mbc2d kernel[0]: No interval found for . Using 8000000
Jul  1 22:31:14 mbc2d kernel[0]: [SmartScrollDriver]Stopping
Jul  1 22:31:14 mbc2d kernel[0]: [SmartScrollDriver]Freeing

アンロード。

$ sudo kextunload -v /tmp/SmartScrollDriver.kext
jp.co.bitz.driver.SmartScrollDriver unloaded and personalities removed.

抜き差しした際に、ログが出力されている事が分かるはずだ。
_ 【Cocoa練習帳】

http://www.bitz.co.jp/weblog/
http://ameblo.jp/bitz/(ミラー・サイト)

2013-07-06 関東第60回Cocoa勉強会

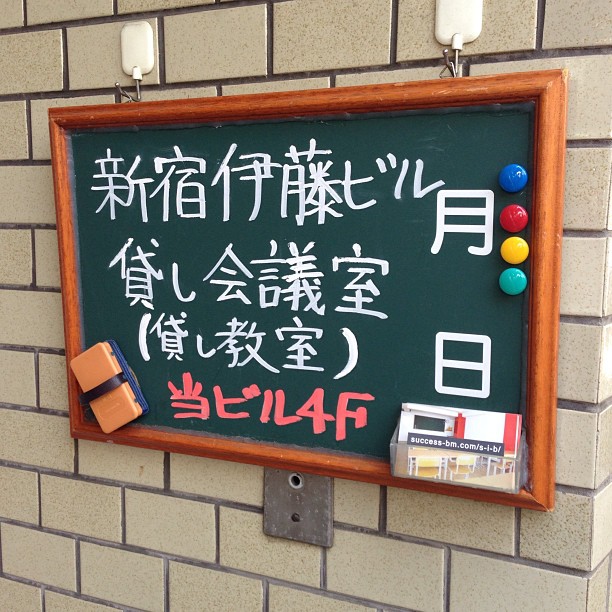
今回は、新宿三丁目で開催。
Bluetooth LEや、IO Kitドライバ、暗号と復号、検出関連のサービスの紹介、圧縮と解凍について発表があった。

関東第60回Cocoa勉強会

2013-07-20 [iOS]AR(カメラのライブプレビュー表示)

話題となっているAR(AugmentedReality)やビーコン(Beacon)について実験だ!

とりあえず、プロジェクトに、AVFoundation.frameworkとCoreMedia.framework、CoreVideo.frameworkを追加しておく。

プロジェクトのInfo.plistのRequired device capabilitiesに、still-cameraとauto-focus-camera、front-facing-camera、camera-flash、video-cameraを追加しておく。

ViewControllerにプレビューを表示するビューを用意する。

@interface ViewController : UIViewController
 
@property (weak, nonatomic) IBOutlet UIView *augmentedRealityView;
 
@end

デバイスモードの設定。フラッシュ(トーチ)を自動に設定。

    /* Set torch and flash mode to auto */
    if ([[self _backFacingCamera] hasFlash]) {
		if ([[self _backFacingCamera] lockForConfiguration:nil]) {
			if ([[self _backFacingCamera] isFlashModeSupported:AVCaptureFlashModeAuto]) {
				[[self _backFacingCamera] setFlashMode:AVCaptureFlashModeAuto];
			}
			[[self _backFacingCamera] unlockForConfiguration];
		}
	}
	if ([[self _backFacingCamera] hasTorch]) {
		if ([[self _backFacingCamera] lockForConfiguration:nil]) {
			if ([[self _backFacingCamera] isTorchModeSupported:AVCaptureTorchModeAuto]) {
				[[self _backFacingCamera] setTorchMode:AVCaptureTorchModeAuto];
			}
			[[self _backFacingCamera] unlockForConfiguration];
		}
	}

カメラデバイスの初期化。背面カメラを利用する事にした。

- (AVCaptureDevice *)_cameraWithPosition:(AVCaptureDevicePosition)position
{
    NSArray *devices = [AVCaptureDevice devicesWithMediaType:AVMediaTypeVideo];
    for (AVCaptureDevice *device in devices) {
        if ([device position] == position) {
            return device;
        }
    }
    return nil;
}
 
- (AVCaptureDevice *)_backFacingCamera
{
    return [self _cameraWithPosition:AVCaptureDevicePositionBack];
}
 
	:
    /* Init the device inputs */
    self.videoInput = [[AVCaptureDeviceInput alloc] initWithDevice:[self _backFacingCamera]
                                                             error:nil];
	:

動画取り込みのセッションを生成して、入力源として背面カメラを設定する。

    /* Create session (use default AVCaptureSessionPresetHigh) */
    self.capureSession = [[AVCaptureSession alloc] init];
    
    /* Add inputs and output to the capture session */
    if ([self.capureSession canAddInput:self.videoInput]) {
        [self.capureSession addInput:self.videoInput];
    }

ライブプレビューのレイヤーを生成して、それをプレビューを表示するビューに追加する。

    /* Create video preview layer and add it to the UI */
    self.captureVideoPreviewLayer = [[AVCaptureVideoPreviewLayer alloc] initWithSession:self.capureSession];
    CALayer *viewLayer = [self.augmentedRealityView layer];
    [viewLayer setMasksToBounds:YES];
    
    CGRect bounds = [self.augmentedRealityView bounds];
    [self.captureVideoPreviewLayer setFrame:bounds];
    
    if ([self.captureVideoPreviewLayer isOrientationSupported]) {
        [self.captureVideoPreviewLayer setOrientation:AVCaptureVideoOrientationPortrait];
    }
    
    [self.captureVideoPreviewLayer setVideoGravity:AVLayerVideoGravityResizeAspectFill];
    
    [viewLayer insertSublayer:self.captureVideoPreviewLayer below:[[viewLayer sublayers] objectAtIndex:0]];

動画取り込みを開始!

    dispatch_async(dispatch_get_global_queue(DISPATCH_QUEUE_PRIORITY_DEFAULT, 0), ^{
        [self.capureSession startRunning];
    });

上記のコードは、ViewControllerの-viewDidLoadに記述したのだが、表示されない!色々調べて分かったのだが、プレビューを表示するビューのサイズが0だ!Storyboardを使っているのだが何故だ!

なんとかして原因は分かった。古いOSをサポートする場合が多いため、StoryboardのAutolayoutを使ってこなかったのだが、Autolayoutを使う場合、-viewDidLoadが呼ばれたタイミングでは、サブ・ビューのサイズが決まっていないというのが理由のようだ。

-viewDidLayoutSubviews:というメソッドがあるので、そこでライブプレビューのレイヤのサイズを設定すればいい。

- (void)viewWillLayoutSubviews
{
    [super viewWillLayoutSubviews];
    
    CGRect bounds = [self.augmentedRealityView bounds];
    [self.captureVideoPreviewLayer setFrame:bounds];
}
AR

_ ソースコード

GitHubからどうぞ。
https://github.com/murakami/workbook/tree/master/ios/AugmentedReality - GitHub


_ 【Cocoa練習帳】

http://www.bitz.co.jp/weblog/
http://ameblo.jp/bitz/(ミラー・サイト)

2013-07-21 [iOS]AR(位置情報)

現在地情報を取得してみる。

プロジェクトに、CoreLocation.frameworkを追加する。

CLLocationManagerDelegateプロトコルを採用する。

#import <UIKit/UIKit.h>
#import <CoreLocation/CoreLocation.h>
 
@interface ViewController : UIViewController <CLLocationManagerDelegate>
 
@property (weak, nonatomic) IBOutlet UIView *augmentedRealityView;
 
@end

CLLocationManagerクラスのインスタンスを生成して、現在地の更新を開始する。

    self.locationManager = [[CLLocationManager alloc] init];
    self.locationManager.delegate = self;
    [self.locationManager startUpdatingLocation];

現在地の更新を受け取る。

- (void)locationManager:(CLLocationManager *)manager didUpdateLocations:(NSArray *)locations
{
    CLLocation  *newLocation = [locations lastObject];
    CLLocationCoordinate2D  newCoordinate = newLocation.coordinate;
    DBGMSG(@"new latitude=%f, longitude=%f", newCoordinate.latitude, newCoordinate.longitude);
}

デバイスの情報も取得してみよう。

電子コンパスが仕様可能な場合は、測定を開始する。

    if ([CLLocationManager headingAvailable]) {
        [self.locationManager startUpdatingHeading];
    }

方位の更新を受け取る。

- (void)locationManager:(CLLocationManager *)manager didUpdateHeading:(CLHeading *)newHeading
{
    DBGMSG(@"trueHeading %f, magneticHeading %f", newHeading.trueHeading, newHeading.magneticHeading);
}

_ ソースコード

GitHubからどうぞ。
https://github.com/murakami/workbook/tree/master/ios/AugmentedReality - GitHub


_ 【Cocoa練習帳】

http://www.bitz.co.jp/weblog/
http://ameblo.jp/bitz/(ミラー・サイト)

トップ 最新 追記