トップ 最新 追記

Cocoa練習帳

iOS/iPhone/iPad/watchOS/tvOS/MacOSX/Android プログラミング, Objective-C, Cocoa, Swiftなど

2012|01|02|03|04|05|06|07|08|09|10|11|12|
2013|01|02|03|04|05|06|07|08|09|10|11|12|
2014|01|02|03|04|05|06|07|08|09|10|11|12|
2015|01|02|03|04|05|06|07|08|09|10|11|12|
2016|01|02|03|04|05|06|07|08|09|10|11|12|
2017|01|02|03|04|05|06|07|08|09|10|11|12|
2018|01|02|03|04|05|06|07|08|09|10|11|12|
2019|01|02|03|04|05|06|07|08|09|10|11|12|
2020|01|02|03|04|05|06|07|08|09|10|11|12|
2021|01|02|03|04|05|06|07|08|09|10|11|12|
2022|01|02|03|04|05|06|07|08|09|10|11|12|
2023|01|02|03|04|05|06|07|08|09|10|11|12|
2024|01|02|03|

2012-03-18 [iOS]座標と描画(その6)

今回で、いままでのまとめだ。自信がないが、自分が理解したことを整理してみる。

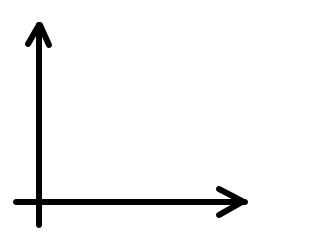
OS X/iOSの描画システム、Core Graphics (Quartz) フレームワークのデフォルト座標系は、左下が原点で、X軸は右方向、Y軸は上方向が正だ。これをApple Developerサイトの文書『iOS描画および印刷ガイド』内では、LLO (lower-left-origin)と呼んでいる。

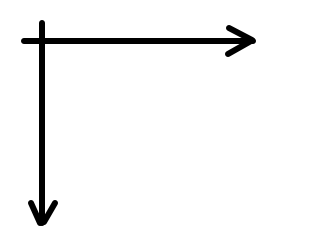
iOSのUIKitフレームワークとCore Animationフレームワークは、変換行列(CTM : Current Transformation Matrix)を使ってデフォルト座標系は、左上が原点で、X軸は右方向、Y軸は下方向が正だ。これをApple Developerサイトの文書『iOS描画および印刷ガイド』内では、ULO (upper-left-origin)と呼んでいる。
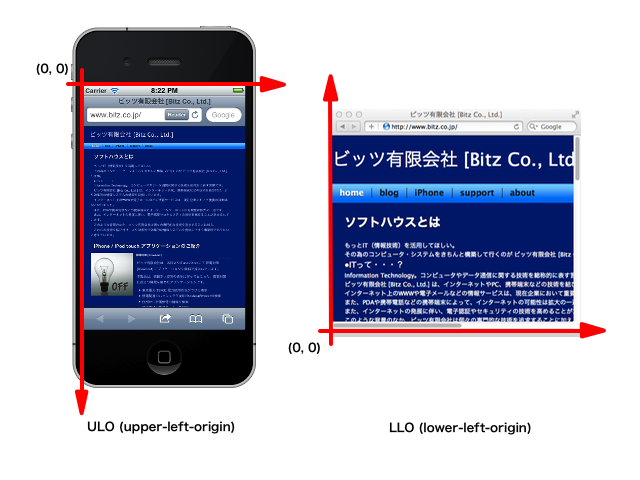
デフォルト座標系

おそらく、UIKitでは、以下の感じでdrawRect:を呼んでいると考えられる。

UIGraphicsBeginImageContextWithOptions
CGContextRef context = UIGraphicsGetCurrentContext();
	[インスタンス drawRect:rect];
UIGraphicsEndImageContext

そして、おそらく、UIGraphicsBeginImageContextWithOptionsでは、以下の感じで、座標系を原点左上 (ULO) に設定していると考えられる。

CGContextTranslateCTM(graphicsContext, 0.0, rect.size.height);
CGContextScaleCTM(graphicsContext, 1.0, -1.0);

UIViewのサブクラスのdrawRect:で描画すれば、他のシステムで慣れた原点左上で悩まなくて済む!と考えると運が悪いと痛い目にあってしまう。

実験してみよう。

upper-left-origin

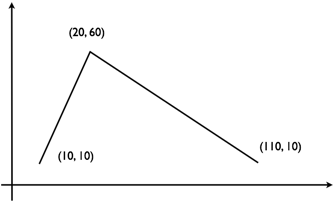
上記の画像を、drawRect:内でCore Graphics関数を使って描画してみる。

- (void)drawRect:(CGRect)rect
{
    CGContextRef    context = UIGraphicsGetCurrentContext();
    UIImage *image = [UIImage imageNamed:@"upper-left-origin.png"];
    CGRect  imageRect;
    imageRect.origin = CGPointMake(10.0, 10.0);
    imageRect.size = image.size;
    CGContextDrawImage(context, imageRect, image.CGImage);
}

描画される位置は、左上からの座標だが、画像が反転している!
反転

これをどう考えるかだが、自分はこう理解した。

例

座標系がどのように変換されるのかは、意識されない。上記の例では、例えば、以下の動作をする。

  • ペンを、(10, 10)に移動する。
  • (10, 10)から(20, 60)にペンを走らせる。
  • (20, 60)から(110, 10)にペンを走らせる。

その為、X軸の下方向が正の座標系だと、上下が逆さまの図が描画される。

こういう訳で、Core Graphicsの関数で、文字列や画像、PDFのような座標の向きを意識する必要がある描画をおこなう場合は、座標系をCoreGraphicsのデフォルト座標系に戻してやる必要がある。

- (void)drawRect:(CGRect)rect
{
    CGContextRef    context = UIGraphicsGetCurrentContext();
    CGContextSaveGState(context);
 
    CGFloat height = self.bounds.size.height;
    CGContextTranslateCTM(context, 0.0, height);
    CGContextScaleCTM(context, 1.0, - 1.0);
 
    CGContextRestoreGState(context);
}

ただし、上記の様に、どの位置に描画するのかを指定する場合は、それを考慮しないと、例では画面の上部でなく下部に表示される。

その為、例では描画位置を座標系の違いを考慮して計算してあげる必要がある。

- (void)drawRect:(CGRect)rect
{
    CGContextRef    context = UIGraphicsGetCurrentContext();
    CGContextSaveGState(context);
 
    CGFloat height = self.bounds.size.height;
    CGContextTranslateCTM(context, 0.0, height);
    CGContextScaleCTM(context, 1.0, - 1.0);
  
    UIImage *image = [UIImage imageNamed:@"upper-left-origin.png"];
    CGRect  imageRect;
    imageRect.origin = CGPointMake(10.0, self.bounds.size.height - 10.0 - image.size.height);
    imageRect.size = image.size;
    CGContextDrawImage(context, imageRect, image.CGImage);
 
    CGContextRestoreGState(context);
}

この話、先日のCocoa勉強会で発表したのだが、チームで開発する場合は、どういうポリシーとするのかを決めておかないと、座標系の変換が混ざってしまって、混乱したソースコードになるという指摘を受けた。

例えば、外部インターフェースで使用する座標系は原点左上にして、左下に戻す等は、モジュール内部に隠蔽するとか、面倒なので、全てを左下原点にするとかだ。


2012-03-17 [Mac][iOS]第51回Cocoa勉強会(関東)

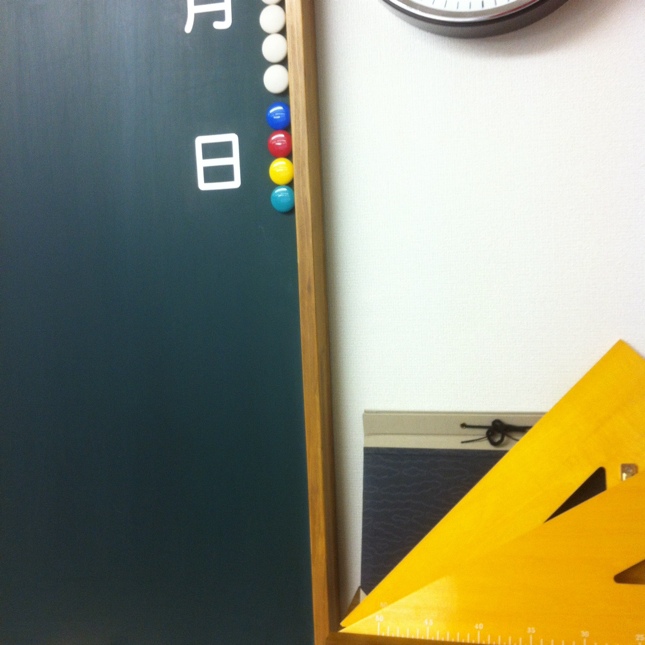
今回のCocoa勉強会(関東)は、自分は夏の節電対策で土日平日となった関係で参加できなかった、新宿三丁目にある新宿伊藤ビルで開催された。

会議室 会議室

発表の内容をざっと説明すると、UIPageViewControllerと座標と描画、Objective-Cの新しいリテラル、デバッグTIPS等だ。今回も業界の動向をうかがい知る事が出来る等、有意義な勉強会だった。


2012-03-16 [iOS]座標と描画(その5)

実は、まだ、理解できていない箇所があるので、再挑戦だ!

Core Graphics (Quartz)のデフォルト座標系は、左下が原点で、X軸は右方向、Y軸は上方向が正だ。

LLO

一方、UIKitのデフォルト座標系は、左上が原点で、X軸は右方向、Y軸は下方向が正となる。

ULO

おそらく、UIKitでは、UIGraphicsBeginImageContextWithOptions()を使った操作に近い手順でコンテキストを用意していると思われる。この関数で得られるコンテキストは、左上が原点で、X軸は右報告、Y軸は下方向が正となる。

ここからが、ややこしい部分だ。

UIKitを使っていれば、慣れた左上が原点の座標系となり、何も悩む事はない、と考えると失敗する。

例えば、CoreGraphicsの関数で文字列を描画する場合。

- (void)drawRect:(CGRect)rect
{
    CGContextRef    context = UIGraphicsGetCurrentContext();
    CGContextSaveGState(context);
    
    CGColorSpaceRef cs = CGColorSpaceCreateDeviceRGB();
    CGContextSetFillColorSpace(context, cs);
    CGColorSpaceRelease(cs);
    
    CGContextSetTextDrawingMode(context, kCGTextFill);
    CGContextSetRGBFillColor(context, 0.0, 0.0, 0.0, 1.0);
    
    CGContextSelectFont(context, "Helvetica", 48.0, kCGEncodingMacRoman);
    CGContextShowTextAtPoint(context, 10.0, 10.0, "Quartz", strlen("Quartz"));
    
    CGContextFlush(context);
    CGContextRestoreGState(context);
}

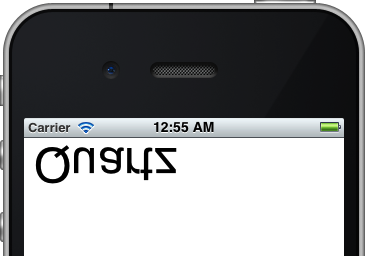
文字が反転してしまう。

反転

その為、上記の例では、文字列を描画する際に、座標系をCoreGraphicsのデフォルトの座標系に戻す必要がある。

- (void)drawRect:(CGRect)rect
{
    CGContextRef    context = UIGraphicsGetCurrentContext();
    CGContextSaveGState(context);
    
    CGFloat height = self.bounds.size.height;
    CGContextTranslateCTM(context, 0.0, height);
    CGContextScaleCTM(context, 1.0, - 1.0);
    
    CGColorSpaceRef cs = CGColorSpaceCreateDeviceRGB();
    CGContextSetFillColorSpace(context, cs);
    CGColorSpaceRelease(cs);
    
    CGContextSetTextDrawingMode(context, kCGTextFill);
    CGContextSetRGBFillColor(context, 0.0, 0.0, 0.0, 1.0);
    
    CGContextSelectFont(context, "Helvetica", 48.0, kCGEncodingMacRoman);
    CGContextShowTextAtPoint(context, 10.0, 10.0, "Quartz", strlen("Quartz"));
    
    CGContextFlush(context);
    CGContextRestoreGState(context);
}
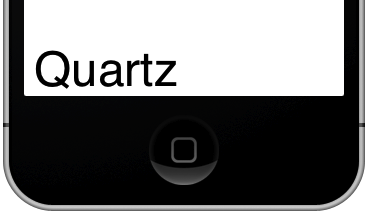
描画

だたし、この場合は、描画する位置を計算し直さないといけなくなる。そうでないと、上記の例のように上段に文字列を描画したかったのに、下段となってしまった。


2012-03-15 [Mac][iOS]Apple Configurator

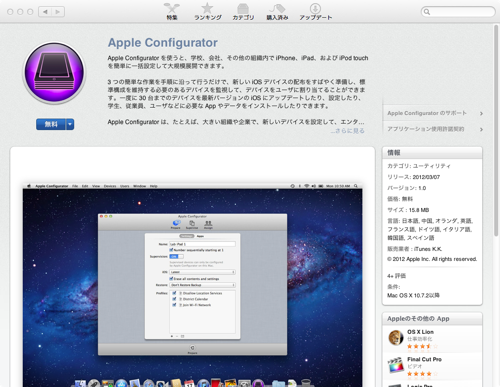
複数台のiPhoneやiPad、iPod touchを一括設定できるアプリケーションが、Mac App Storeで公開されている。

AppStore

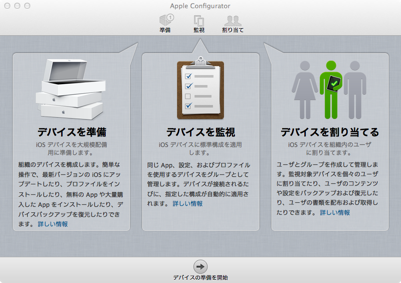
インストールして起動すると、こんなウィンドウが表示される。

起動画面

既に、試された方がいるようだ。


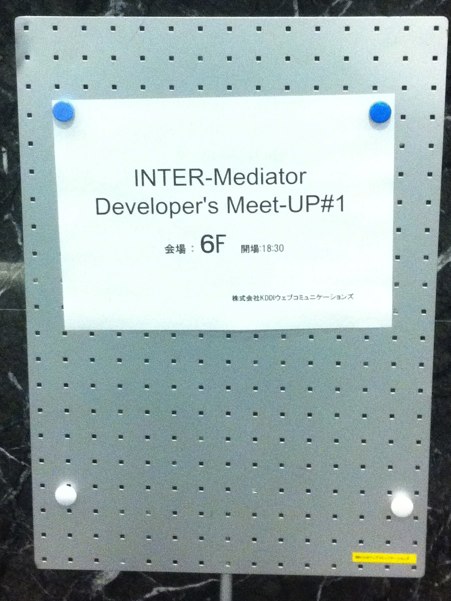
2012-03-14 [Web]第1回 INTER-Mediator開発者ミーティング

KDDIセミナールームで開催された、第1回 INTER-Mediator開発者ミーティングに参加してきた!

貢献できるように頑張ります!

INTER-Mediator
http://inter-mediator.info/

2012-03-13 [iOS]ユーザに選択させる(UIActionSheet)

前回のアラートは、ユーザに情報を伝える為のもの。今回のアクション・シートはユーザに選択させる為のものだ。

ビューコントローラにUIActionSheetDelegateプロトコルを設定する。

@interface ViewController : UIViewController <UIActionSheetDelegate>
@end

アクションシートを表示させる。

@implementation ViewController
 
- (void)touchesEnded:(NSSet *)touches withEvent:(UIEvent *)event
{
    UIActionSheet   *actionSheet = [[UIActionSheet alloc] initWithTitle:@"My Action Sheet"
                                                               delegate:self
                                                      cancelButtonTitle:@"Cancel"
                                                 destructiveButtonTitle:@"destructive button"
                                                      otherButtonTitles:@"Button 1",
                                                                        @"Button 2", 
                                                                        nil];
    [actionSheet showInView:self.view];
}
 
@end

アラートと同様にアクション・シートもデリゲートのメソッドでボタン押下に対応する。

@implementation ViewController
  
- (void)actionSheet:(UIActionSheet *)actionSheet clickedButtonAtIndex:(NSInteger)buttonIndex
{
    NSLog(@"%s index(%d)", __func__, (int)buttonIndex);
}
 
- (void)actionSheetCancel:(UIActionSheet *)actionSheet
{
    NSLog(@"%s", __func__);
}
 
@end

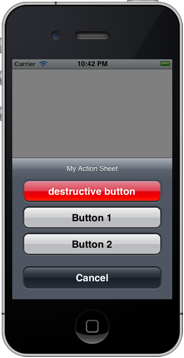
実行。

アクションシート

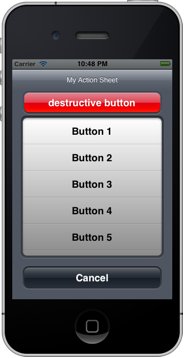
アクション・シートでは、追加するボタンの個数は可変だ。画面に収まりきれなく個数を指定した場合は、どうなるのだろうか?

@implementation ViewController
 
- (void)touchesEnded:(NSSet *)touches withEvent:(UIEvent *)event
{
    UIActionSheet   *actionSheet = [[UIActionSheet alloc] initWithTitle:@"My Action Sheet"
                                                               delegate:self
                                                      cancelButtonTitle:@"Cancel"
                                                 destructiveButtonTitle:@"destructive button"
                                                      otherButtonTitles:@"Button 1",
                                                                        @"Button 2",
                                                                        @"Button 3",
                                                                        @"Button 4",
                                                                        @"Button 5",
                                                                        @"Button 6", 
                                                                        nil];
    [actionSheet showInView:self.view];
}
 
@end
ピッカー

なんと、ボタンの部分がピッカーになっている!

第50回関東Cocoa勉強会で@saeki24hさんが、自身が発見されたアクション・シートのバグを発表されていましたが、その時はボタンの個数が増えてピッカーになった際に、cancelボタンとdestructiveボタンの順番が変わって、その際、インデックスがおかしくなっていたが、iOS 5.1で修正されたのか、ボタンの順番が変わらず、その為か、インデックスは正しい値のようだ。


2012-03-12 [iOS]アラートを表示する

ビーコントローラでタッチ操作を検出するようにして、タッチされたら、OKボタンのみのアラートを表示する例だ。

ビューコントローラにプロトコルを使って、UIAlertViewDelegateへ対応させる。

@interface ViewController : UIViewController <UIAlertViewDelegate>
@end

タッチされたらOKボタンのみのシンプルなアラートを表示させる。

@implementation ViewController
 
- (void)touchesEnded:(NSSet *)touches withEvent:(UIEvent *)event
{
    UIAlertView *alert = [[UIAlertView alloc] initWithTitle:@"Demo Alert"
                                                    message:@"demo appl"
                                                   delegate:self
                                          cancelButtonTitle:nil
                                          otherButtonTitles:@"OK", nil];
    [alert show];
}
 
@end

OKボタンが押下されたら呼び出される、デリゲートのメソッドを追加する。

@implementation ViewController
  
- (void)alertView:(UIAlertView *)alertView clickedButtonAtIndex:(NSInteger)buttonIndex
{
    NSLog(@"- (void)alertView:(UIAlertView *)alertView clickedButtonAtIndex:(NSInteger)buttonIndex(%d)", (int)buttonIndex);
}
 
@end

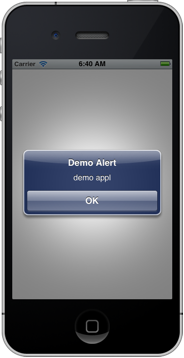
実行。

alert

2012-03-11 [iOS]CoreAnimation(animating transitions)

画像に続いて文字列に対しても、何らかの画面上の効果を発生させたいと考えている。今、考えているのは、UILabeに対してだ。

前回までのUIViewに対してのアニメーションだと、対象のプロパティがアニメーションになるのだが、今回は効果に対応するプロパティを変更する必要が無い。変更したら、完了後に戻す処理が必要になる。

今、考えている事に合う手段はないか?と、探していて見つけたのだ、レイヤへの効果の適用だ。

まず、Quartz Coreフレームワークをプロジェクトに追加する。そして、QuartzCore/QuartzCore.hをインポートする。

サンプルではラベルの内容の変化が分かるように日付を設定している。

ラベルに現在日時を初期値として設定する。

- (void)awakeFromNib
{
    NSDate  *date = [NSDate date];
    NSDateFormatter *formatter = [[NSDateFormatter alloc] init];
    [formatter setDateStyle:NSDateFormatterMediumStyle];
    [formatter setTimeStyle:NSDateFormatterMediumStyle];
    self.label.text = [formatter stringFromDate:date];
}

画面がタッチされたら、ラベルの内容を現在日時に変更して、アニメーションを実行する。

- (void)touchesEnded:(NSSet *)touches withEvent:(UIEvent *)event
{
    CATransition    *animation = [CATransition animation];
    [animation setDelegate:self];
    [animation setDuration:1.0f];
    [animation setTimingFunction:[CAMediaTimingFunction functionWithName:kCAMediaTimingFunctionEaseInEaseOut]];
    [animation setType:kCATransitionPush];
    [animation setSubtype:kCATransitionFromLeft];
    NSDate  *date = [NSDate date];
    NSDateFormatter *formatter = [[NSDateFormatter alloc] init];
    [formatter setDateStyle:NSDateFormatterMediumStyle];
    [formatter setTimeStyle:NSDateFormatterMediumStyle];
    self.label.text = [formatter stringFromDate:date];
    [[self.label layer] addAnimation:animation forKey:@"animation transition"];
}

文字が左から右に流れた後に、内容が変わる事が確認できるはずだ。

_ ソースコード

GitHubからどうぞ。
https://github.com/murakami/workbook/tree/master/ios/CoreAnimation - GitHub

_ 関連情報

Core Animation for Mac OS X and the iPhone
Creating Compelling Dynamic User Interfaces
Core Animationプログラミングガイド
アニメーションのタイプとタイミング
iOS Developer Libraryの翻訳文書だ。

2012-03-10 [iOS]CoreAnimation(flip view)

画面に表示する画像を差し替える場合、カードをめくるような効果を使える例だ。

- (void)touchesEnded:(NSSet *)touches withEvent:(UIEvent *)event
{
    [UIView beginAnimations:@"flip view" context:nil];
    [UIView setAnimationTransition:UIViewAnimationTransitionFlipFromLeft
                           forView:self.imageView
                             cache:YES];
    [UIView setAnimationCurve:UIViewAnimationCurveEaseInOut];
    [UIView setAnimationDuration:1.0];
    if (self.isAtMark) {
        self.isAtMark = NO;
        self.imageView.image = self.arrowImage;
        
    }
    else {
        self.isAtMark = YES;
        self.imageView.image = self.atmarkImage;        
    }
    [UIView commitAnimations];
}

前回の例との差は、transitionとタイミングの指定の追加だ。

_ ソースコード

GitHubからどうぞ。
https://github.com/murakami/workbook/tree/master/ios/CoreAnimation - GitHub

_ 関連情報

Core Animation for Mac OS X and the iPhone
Creating Compelling Dynamic User Interfaces
Core Animationプログラミングガイド
アニメーションのタイプとタイミング
iOS Developer Libraryの翻訳文書だ。

2012-03-08 [iOS]iOS 5.1

今回は、iOS 5.1リリースに伴う、開発環境の更新に時間がかかっているため、いつもの練習が行えない。そこで、Developerサイトで見つけたページを紹介する。

iOSがバージョンアップすると、Xcodeもバージョンアップしないと、実機での動作確認が行えない。何時も、Xcodeのバージョンアップの方が少し遅れて始まるので、リリースを控えている場合は注意が必要だ。

そして、iOSがバージョナップすると、Xcodeのバージョンアップは必要か?ターゲットは、以前のバージョンのOSからなので、Xcodeのバージョンアップは?ということが話題になるように思えるが、その疑問に答えるサイトだ。

以前のADC時代から考えると、本当に最近のApple Developerサイトは、親切になったね!


2012-03-07 [iOS]CoreAnimation(animation block)

CoreAnimationは奥が深い。その為、申し訳ないが、今、開発中のアプリケーションで利用しそうな機能を中心に取り上げてゆく。今回はアニメーション・ブロック。

画面をタッチすると、タッチした位置に画像が移動するコードだ。

- (void)touchesEnded:(NSSet *)touches withEvent:(UIEvent *)event
{
    UITouch *touch = touches.anyObject;
    [UIView beginAnimations:@"center" context:nil];
    self.atMarkImageView.center = [touch locationInView:self];
    [UIView commitAnimations];
}

beginAnimations:context:とcommitAnimationsに囲まれた部分がブロックだ。ブロック内に記述されたUIViewの変更内容がアニメーションとなる。

_ ソースコード

GitHubからどうぞ。
https://github.com/murakami/workbook/tree/master/ios/CoreAnimation - GitHub

_ 関連情報

Core Animation for Mac OS X and the iPhone
Creating Compelling Dynamic User Interfaces
Core Animationプログラミングガイド
アニメーションのタイプとタイミング
iOS Developer Libraryの翻訳文書だ。

2012-03-06 [iOS]文字列を描画する

iOSでは文字列を描画する方法が複数あるが、それぞれ、長所と短所があるので、適材適所で使い分ける事が大事なようだ。

UILabelを使用する方法。単に描画したいだけなので、ビューでなくてもと思うかもしれないが、高機能なので便利だ。

- (void)viewDidLoad
{
    [super viewDidLoad];
     
    self.label = [[UILabel alloc] initWithFrame:CGRectMake(10.0, 100.0, 200, 50)];
    self.label.font = [UIFont systemFontOfSize:48.0];
    self.label.text = @"UILabel";
    self.label.adjustsFontSizeToFitWidth = YES;
    [self.view addSubview:self.label];
}

UIViewのサブクラスを作成して、-drawRect:で、NSStringのUIKit Additionsで描画するのも手軽だ。

- (void)drawRect:(CGRect)rect
{
    NSString    *str = @"NSString";
    [str drawAtPoint:CGPointMake(10.0, 20.0) withFont:[UIFont systemFontOfSize:48.0]];
}

CoreGraphicsを使う方法もあるが、日本語の扱いや、座標の扱いが難しいので、理由が無い限りはお勧めできない。

- (void)drawRect:(CGRect)rect
{
    CGContextRef    context = UIGraphicsGetCurrentContext();
    CGContextSaveGState(context);
        
    CGFloat height = self.bounds.size.height;
    CGContextTranslateCTM(context, 0.0, height);
    CGContextScaleCTM(context, 1.0, - 1.0);
    
    CGColorSpaceRef cs = CGColorSpaceCreateDeviceRGB();
    CGContextSetFillColorSpace(context, cs);
    CGColorSpaceRelease(cs);
        
    CGContextSetTextDrawingMode(context, kCGTextFill);
    CGContextSetRGBFillColor(context, 0.0, 0.0, 0.0, 1.0);
    
    CGContextSelectFont(context, "Helvetica", 48.0, kCGEncodingMacRoman);
    CGContextShowTextAtPoint(context, 10.0, 10.0, "Quartz", strlen("Quartz"));
 
    CGContextFlush(context);
    CGContextRestoreGState(context);
}

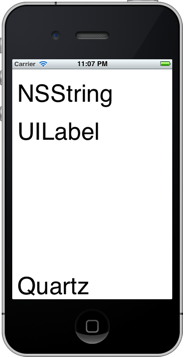
これら三つを使って文字列を描画した例だ。

DrawString

_ ソースコード

GitHubからどうぞ。
https://github.com/murakami/workbook/tree/master/ios/DrawString - GitHub

_ 関連情報

iOS描画および印刷ガイド
Apple Developerサイトの情報。日本語に翻訳されている。
MOSADeN Online:「iPhoneアプリ初級脱出Online:高橋政明」
豊平文庫アプリケーションの高橋さんの記事。丁寧な説明で参考になる。

2012-03-05 [iOS]イベント駆動のXMLプログラミング(その2)

前回の続き。用語を整理する。

エレメントは以下の初期となる。

<タグ>内容</タグ>

エレメントとは、タグで囲まれたデータという事になる。

XMLデータを頭から処理していき、エレメントに到達すると- parser:didStartElement:namespaceURI:qualifiedName:attributes:が呼ばれる。そのエレメントの内容に到達すると- parser:foundCharacters:が呼ばれるイメージだ。

XMLデータは木構造となるが、SAXではイベント駆動でデリゲートのメソッドが呼ばれるので、アプリケーション側で木構造を意識して処理する事になる。

例えば、以下のようなXMLデータ。

<?xml version= "1.0" encoding="UTF8">
<article author="Yukio MURAKAMI">
    <para>とても短い文章。</para>
</article>
  1. 処理開始
  2. エレメントarticleの開始タグが得られる。
  3. エレメントarticleの属性authorと値"Yukio MURAKAMI"が得られる。
  4. エレメントparaの開始タグが得られる。エレメントarticleの終了タグはまだなので、paraはarticleに包含されている事が分かる。
  5. エレメントparaの内容”とても短い文書。”が得られる。
  6. エレメントparaの終了タグが得られる。
  7. エレメントarticleの終了タグが得られる。
  8. 処理終了

_ ソースコード

GitHubからどうぞ。
https://github.com/murakami/workbook/tree/master/ios/XMLParser - GitHub

_ 関連情報

Event-Driven XML Programming Guide
Apple Developerサイトの情報。

トップ 最新 追記